ECU Mapping Basics: Understanding Fuel Maps and Ignition Timing
Meta description: Avoid costly errors by learning from common upgrade mistakes. This article highlights 7 crucial errors to avoid when installing engine upgrades, ensuring a safe and reliable performance enhancement. Protect your investment with proper installation techniques.
Introduction: Why Avoiding Engine Upgrade Mistakes is Crucial
So you're thinking about beefing up your engine? Awesome! Engine upgrades can seriously improve performance, fuel economy, and even the overall driving experience. But hold your horses, cowboy! Before you start wrenching, it's super important to know the common pitfalls. Messing up an engine upgrade can lead to reduced performance, engine damage, and a whole lot of frustration. This guide will walk you through the most common mistakes and give you tips on how to avoid them, ensuring your upgrade goes smoothly and gets you the results you're after.
Mistake #1: Skipping the Research & Proper Planning - Engine Upgrade Project Planning
This is where it all starts. Don't just jump in because you saw a cool part online. You need a solid plan. First, define your goals: What are you hoping to achieve with this upgrade? More horsepower? Better fuel economy? Improved towing capacity? Once you know your goals, research the specific parts and modifications that will help you reach them. Read reviews, watch videos, and talk to experienced mechanics. Make sure the parts are compatible with your engine and each other. This is also the time to gather all the necessary tools and equipment. Having everything ready before you start will save you time and headaches later. Don't forget to factor in a realistic budget, including the cost of parts, labor (if you're not doing it yourself), and potential unexpected expenses.
Mistake #2: Ignoring Compatibility Issues - Engine Parts Compatibility Check
Just because a part *fits* doesn't mean it's *compatible*. Engine components are designed to work together, and using mismatched parts can cause serious problems. For example, slapping a high-performance camshaft on a stock engine without upgrading the valve springs can lead to valve float and engine damage. Always check the manufacturer's specifications to ensure compatibility. Use online compatibility checkers, consult with experts, and double-check everything before you buy. This is especially important when mixing and matching parts from different manufacturers. A little extra research upfront can prevent a lot of headaches down the road.
Mistake #3: Neglecting Proper Preparation - Engine Preparation Before Upgrades
Before you start installing new parts, make sure your engine is clean and in good working order. This means cleaning the engine bay, checking for leaks, and addressing any existing issues. Replace worn-out parts, such as belts, hoses, and spark plugs, before you begin the upgrade. This will ensure that the new parts are working with a healthy engine. Also, take the time to properly prepare the surfaces for new gaskets and seals. Clean them thoroughly and use the correct sealant to prevent leaks. Proper preparation is essential for a successful and long-lasting upgrade.
Mistake #4: Not Following Installation Instructions Carefully - Engine Upgrade Installation Guide
Installation instructions are there for a reason! Don't just wing it. Read the instructions thoroughly before you start, and follow them step-by-step. Pay attention to torque specifications, wiring diagrams, and any other specific instructions provided by the manufacturer. If you're not comfortable with a particular step, seek professional help. Using the wrong tools or techniques can damage the parts or even the engine itself. Online forums and videos can be helpful, but always rely on the manufacturer's instructions as the primary source of information.
Mistake #5: Over-Torquing Bolts - Proper Torque Specifications for Engine Upgrades
Over-torquing bolts is a common mistake that can lead to stripped threads, broken bolts, and damaged components. Always use a torque wrench to tighten bolts to the specified torque. Refer to the manufacturer's instructions for the correct torque values. If you're not sure, it's better to under-torque than over-torque. Under-torqued bolts can be tightened later, but over-torqued bolts can be difficult or impossible to remove without causing damage. Invest in a good quality torque wrench and learn how to use it properly. It's a small investment that can save you a lot of money in the long run.
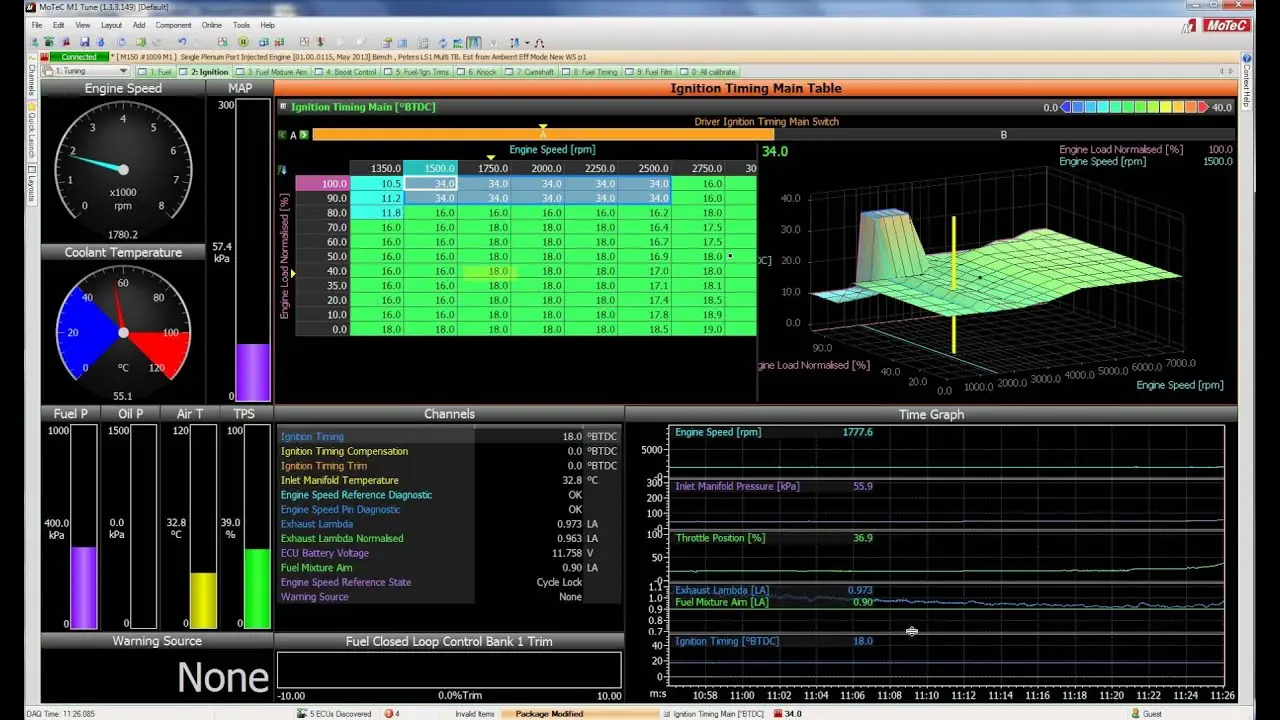
Mistake #6: Forgetting to Re-Tune the Engine - Engine Tuning After Upgrades
Many engine upgrades require re-tuning the engine's computer (ECU) to optimize performance. This is especially important when installing performance parts such as camshafts, fuel injectors, or turbochargers. Re-tuning the ECU allows the engine to take full advantage of the new parts and prevents potential problems such as lean running or detonation. You can either use a pre-programmed tune, have a custom tune created by a professional tuner, or use a tuning device to adjust the ECU yourself. Choose the option that best suits your needs and experience level. Don't skip this step, or you'll be leaving performance on the table and potentially damaging your engine.
Mistake #7: Not Performing a Proper Break-In - Engine Break-In Procedure After Upgrades
New engine parts need to be broken in properly to ensure optimal performance and longevity. This is especially important for new camshafts, piston rings, and bearings. Follow the manufacturer's recommended break-in procedure. This typically involves running the engine at varying speeds and loads for a specified period of time. Avoid prolonged idling, high RPMs, and heavy loads during the break-in period. Change the engine oil and filter after the break-in period to remove any debris that may have accumulated. A proper break-in will help the parts seat properly and ensure a long and healthy life for your engine.
Recommended Products & Their Uses
1. Cold Air Intake - K&N 69-Series Typhoon Cold Air Intake Kit
Use: Improves engine airflow for increased horsepower and torque, better throttle response, and enhanced engine sound.
Scenario: Ideal for daily drivers and weekend enthusiasts who want a noticeable performance boost without major modifications. A cold air intake pulls cooler air from outside the engine bay, which is denser and contains more oxygen, leading to more efficient combustion.
Comparison: Compared to other brands like AEM and Injen, K&N is known for its high-quality filters, durable construction, and relatively easy installation. AEM intakes often prioritize maximum airflow, while Injen focuses on unique designs and sound.
Price: $250 - $400
2. Performance Exhaust System - Borla S-Type Cat-Back Exhaust System
Use: Reduces backpressure, freeing up horsepower and torque. Also provides a more aggressive exhaust note.
Scenario: Perfect for those looking to improve both performance and sound. A cat-back system replaces the exhaust piping from the catalytic converter back to the tailpipe.
Comparison: Borla, Magnaflow, and Flowmaster are all popular exhaust brands. Borla is known for its refined sound and high-quality stainless steel construction. Magnaflow offers a good balance of performance and affordability, while Flowmaster is known for its aggressive, loud sound.
Price: $600 - $1500
3. High-Performance Camshaft - Comp Cams Xtreme Energy Camshaft
Use: Increases horsepower and torque by optimizing valve timing and lift. Requires careful selection and installation.
Scenario: For serious performance enthusiasts who are willing to invest in more complex modifications. A camshaft upgrade can significantly alter the engine's power curve.
Comparison: Comp Cams, Edelbrock, and Holley are leading camshaft manufacturers. Comp Cams offers a wide range of camshafts for different applications and performance levels. Edelbrock camshafts are known for their smooth idle and good street manners, while Holley focuses on high-performance racing applications.
Price: $200 - $600 (plus installation and tuning costs, which can be significant)
4. Performance Fuel Injectors - Injector Dynamics ID1050x Fuel Injectors
Use: Provides increased fuel flow for engines with higher horsepower demands. Essential for forced induction applications.
Scenario: Necessary when upgrading to a turbocharger or supercharger, or when making significant power increases with naturally aspirated engines. Larger injectors can supply the extra fuel needed to prevent lean running.
Comparison: Injector Dynamics, DeatschWerks, and Bosch are reputable fuel injector brands. Injector Dynamics are known for their precise flow rates and excellent atomization. DeatschWerks offers a good balance of performance and affordability, while Bosch injectors are known for their reliability and durability.
Price: $500 - $1200 (for a set of injectors)
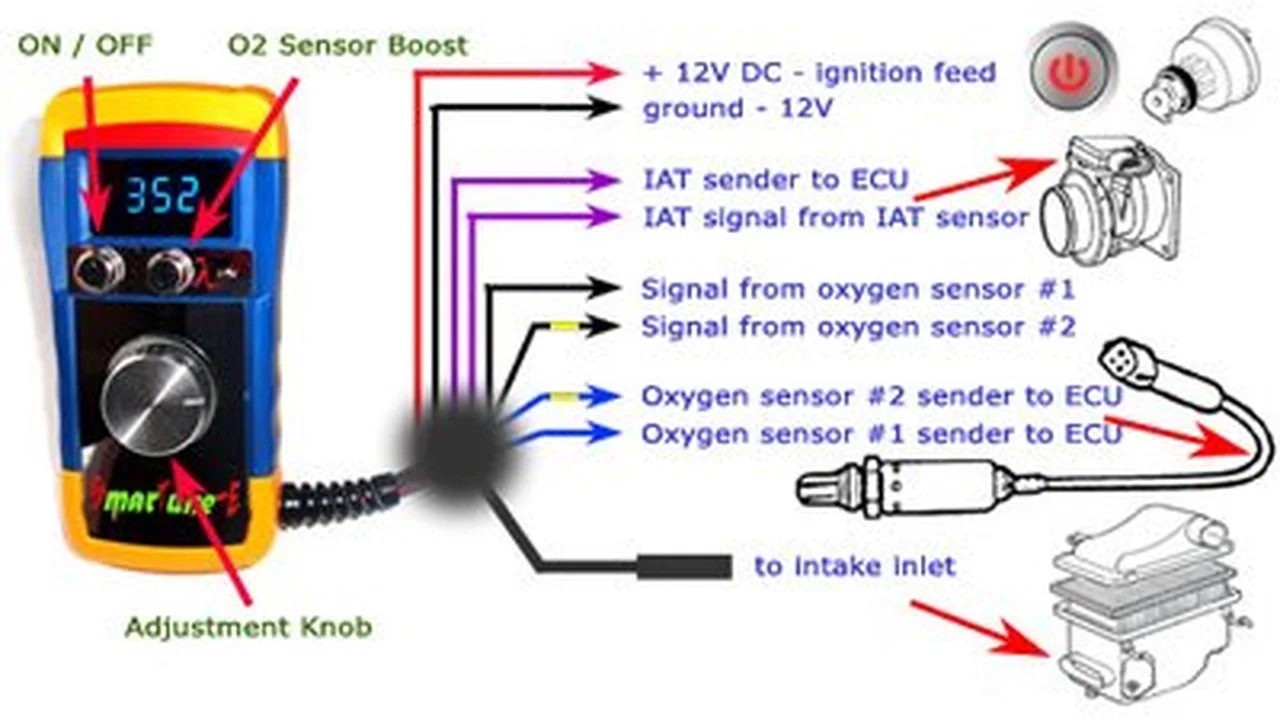
5. Engine Tuning Device - Cobb Accessport V3
Use: Allows you to re-tune your engine's ECU for optimal performance after installing upgrades. Provides data logging and diagnostic capabilities.
Scenario: Essential for maximizing the benefits of engine upgrades and preventing potential problems. Allows you to adjust various engine parameters, such as fuel mixture, ignition timing, and boost pressure.
Comparison: Cobb Accessport, SCT X4, and HP Tuners MPVI2 are popular tuning devices. The Cobb Accessport is known for its user-friendly interface and pre-loaded tunes. The SCT X4 offers a good balance of features and affordability, while the HP Tuners MPVI2 is a more advanced option for professional tuners.
Price: $600 - $1000
6. Torque Wrench - GearWrench 81230P 1/2" Drive Torque Wrench
Use: Ensures bolts are tightened to the correct torque specification, preventing over-tightening and damage.
Scenario: An absolute must-have for any engine upgrade project. Prevents stripped threads, broken bolts, and other costly mistakes.
Comparison: GearWrench, Snap-on, and Craftsman are well-known torque wrench brands. GearWrench offers a good balance of quality and affordability. Snap-on torque wrenches are known for their high accuracy and durability, while Craftsman offers a more budget-friendly option.
Price: $100 - $300
7. Digital Angle Gauge - Digital Torque Angle Gauge
Use: Measures the angle of rotation when tightening bolts, ensuring they are tightened to the correct specification.
Scenario: Required for some engine upgrade projects that specify torque-to-angle tightening methods. Provides more precise tightening than torque alone.
Comparison: Digital angle gauges are available from various brands, including Snap-on, Matco, and ACDelco. Choose a gauge that is accurate, easy to use, and compatible with your torque wrench.
Price: $50 - $200
Tips for a Successful Engine Upgrade
- Take Your Time: Don't rush the process. Rushing can lead to mistakes.
- Stay Organized: Keep track of all the parts, bolts, and tools.
- Take Pictures: Before disassembling anything, take pictures to help you remember how everything goes back together.
- Ask for Help: If you're not sure about something, don't hesitate to ask for help from a qualified mechanic.
- Double-Check Everything: Before starting the engine, double-check all the connections, torque specifications, and fluid levels.
Final Thoughts: Enjoy the Process!
Engine upgrades can be a rewarding experience. By avoiding these common mistakes and following the tips in this guide, you can ensure a successful upgrade and enjoy the benefits of increased performance and enhanced driving experience. Remember to do your research, plan carefully, and take your time. Good luck, and have fun!
:max_bytes(150000):strip_icc()/277019-baked-pork-chops-with-cream-of-mushroom-soup-DDMFS-beauty-4x3-BG-7505-5762b731cf30447d9cbbbbbf387beafa.jpg)