How to Perform a Leak-Down Test: Diagnosing Internal Engine Issues
A leak-down test can help diagnose internal engine issues. This guide explains how to perform a leak-down test and interpret the results to pinpoint the source of the problem. Diagnose internal engine problems with a leak-down test.
Understanding the Leak-Down Test Diagnostics Principle
So, your engine's not running quite right, huh? Maybe it's down on power, burning oil, or just sounds a little off. Before you tear the whole thing apart, a leak-down test can be a lifesaver. It's like giving your engine a stethoscope, allowing you to listen for internal problems without major disassembly. The basic idea is simple: you pressurize each cylinder and measure how much air leaks out. The location of the leak tells you where the problem lies.
Leak-Down Test Tools and Equipment Required
Before you get started, gather your tools. You'll need:
- A leak-down tester: These are readily available online or at auto parts stores. Prices range from around $50 for a basic one to $200+ for a more professional unit. Brands like OTC, Innova, and Motion Pro are popular choices.
- An air compressor: Make sure it can supply at least 80-100 PSI.
- A spark plug socket: To remove the spark plugs.
- A wrench: To turn the crankshaft.
- A screwdriver: Maybe needed for removing air intake components.
- Ear protection: It can get noisy!
Product Recommendations:
- Innova 3630 Leakdown Tester Kit: A solid mid-range option, offering good accuracy and durability. Around $80-$120. Great for the home mechanic.
- OTC 5609 Engine Leakage Tester Kit: A more professional-grade tester, with more robust construction and a wider range of adapters. Expect to pay $150-$250. Suitable for frequent use.
Preparing Your Engine for the Leak-Down Test Procedure
Safety first! Make sure the engine is cool before starting. Disconnect the negative battery cable. Now, remove all the spark plugs. This is crucial because you'll be turning the engine over by hand, and removing the plugs makes it much easier. Label the spark plug wires (if applicable) so you can reconnect them correctly later.
Step-by-Step Guide on How to Perform a Leak-Down Test
- Find Top Dead Center (TDC) on the Cylinder You're Testing: This is the most important step. You need the piston to be at the very top of its compression stroke, with both intake and exhaust valves closed. The easiest way to do this is to turn the crankshaft by hand (using a wrench on the crankshaft pulley nut) until the timing mark on the pulley aligns with the TDC mark on the engine. Double-check that both valves are closed by observing the rocker arms (if visible) or by gently probing with a screwdriver through the spark plug hole. The valves should be fully seated.
- Connect the Leak-Down Tester: Screw the appropriate adapter from your leak-down tester kit into the spark plug hole of the cylinder you're testing. Then, connect the tester's air hose to the adapter.
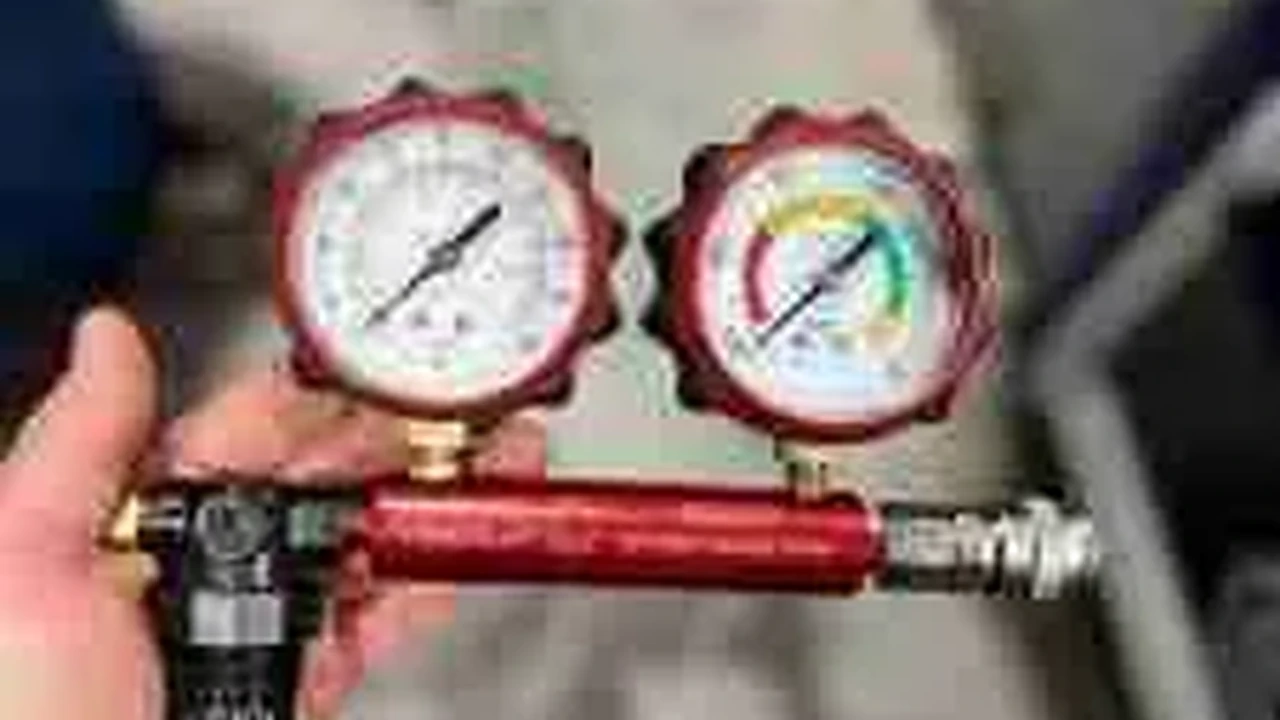
- Apply Air Pressure: Connect the air compressor hose to the leak-down tester. Slowly increase the air pressure to the recommended level (usually around 80-100 PSI). The tester will have two gauges: one showing the input pressure and one showing the percentage of leakage.
- Observe the Leakage Percentage: A healthy engine will typically show leakage of around 5-10%. Anything above 20% indicates a problem. Pay attention to the gauge and note the percentage of leakage.
- Listen for Air Leaks: This is where the real diagnosis begins. Listen carefully for air escaping from different areas:
- Air hissing from the tailpipe: Indicates a leaking exhaust valve.
- Air hissing from the intake manifold or throttle body: Indicates a leaking intake valve.
- Air bubbling in the radiator: Indicates a leaking head gasket or cracked cylinder head (allowing compression to leak into the cooling system).
- Air hissing from the oil filler cap or dipstick tube: Indicates leaking piston rings.
- Repeat for Each Cylinder: Rotate the crankshaft to bring each cylinder to TDC and repeat the test. Make sure to note the leakage percentage and the location of any air leaks for each cylinder.
Interpreting Leak-Down Test Results for Accurate Engine Diagnostics
Now, let's decipher those results:
- High Leakage (above 20%) with Air from the Tailpipe: This strongly suggests a leaking exhaust valve. The valve might be burned, bent, or simply not seating properly due to carbon buildup.
- High Leakage (above 20%) with Air from the Intake Manifold: This points to a leaking intake valve. Similar to the exhaust valve, it could be damaged or not seating correctly.
- High Leakage (above 20%) with Air Bubbling in the Radiator: A blown head gasket is the most likely culprit, allowing combustion pressure to leak into the cooling system. A cracked cylinder head could also be the cause, but it's less common.
- High Leakage (above 20%) with Air from the Oil Filler Cap/Dipstick Tube: This indicates worn or broken piston rings. The rings are no longer sealing properly against the cylinder walls, allowing compression to escape into the crankcase.
- Low Leakage (5-10%): This is generally considered a healthy engine. A small amount of leakage is normal due to manufacturing tolerances and ring wear.
Troubleshooting Common Leak-Down Test Problems and Solutions
Sometimes, things don't go as planned. Here are some common issues and how to address them:
- Difficulty Finding TDC: Use a piston stop tool (screws into the spark plug hole) to accurately locate TDC. This tool prevents the piston from going past TDC, making it easier to find the exact top position.
- The Engine Keeps Rotating: Make sure the car is in gear (manual transmission) or park (automatic transmission) and the parking brake is firmly engaged. You might also need a helper to hold the crankshaft pulley to prevent rotation.
- The Leak-Down Tester is Giving Inconsistent Readings: Make sure all connections are tight and that the air compressor is providing a stable pressure. Also, check the calibration of the leak-down tester itself.
- Unable to Hear the Air Leak: Use a length of rubber hose as a makeshift stethoscope to pinpoint the location of the leak more accurately.
Leak-Down Test vs Compression Test Understanding the Difference
The leak-down test and compression test are both used to assess engine health, but they provide different information. A compression test measures the peak pressure achieved in each cylinder during cranking. It's a quick and easy test, but it doesn't pinpoint the source of the leak. A leak-down test, on the other hand, measures the *rate* of leakage and allows you to identify *where* the leak is occurring. Think of it this way: a compression test tells you *if* there's a problem, while a leak-down test tells you *what* the problem is.
Using Results for Engine Repair and Maintenance Planning
Based on the leak-down test results, you can plan your engine repairs more effectively. For example:
- Leaking Valves: Requires valve grinding or replacement. You'll need to remove the cylinder head and take it to a machine shop for valve work.
- Blown Head Gasket: Requires head gasket replacement. This involves removing the cylinder head, cleaning the mating surfaces, and installing a new head gasket.
- Worn Piston Rings: Requires piston ring replacement. This is a more involved repair, often requiring engine removal and disassembly.
Preventative Maintenance Tips for Improved Engine Performance
Prevention is always better than cure! Regular maintenance can help prevent internal engine problems and extend the life of your engine:
- Regular Oil Changes: Use high-quality engine oil and change it according to the manufacturer's recommendations.
- Proper Cooling System Maintenance: Flush and refill the cooling system regularly to prevent corrosion and overheating.
- Use Quality Fuel: Avoid using low-quality fuel that can lead to carbon buildup on valves and pistons.
- Address Problems Early: Don't ignore warning signs like decreased power, oil consumption, or unusual noises. Address problems promptly to prevent further damage.
By understanding how to perform and interpret a leak-down test, you can diagnose internal engine problems accurately and make informed decisions about repairs. Good luck, and happy wrenching!
:max_bytes(150000):strip_icc()/277019-baked-pork-chops-with-cream-of-mushroom-soup-DDMFS-beauty-4x3-BG-7505-5762b731cf30447d9cbbbbbf387beafa.jpg)